Patient Registration Settings
The Patient Registration Settings in your Virtual Practice empower you to tailor the patient registration experience to suit your organization’s needs. This includes settings for account approval protocols, self-sign-up options, registration form fields, e-signature requirements, and customized messages for self-sign-up forms. With these settings, you have complete control over how new patients register and interact with your Virtual Practice. This setting will be applied to all patient registration forms within the Virtual Practice, including Appointment Booking forms and Appointment Widget.
Security Reminder: It is recommended, all user accounts undergo verification by administrators, and strengthen authentication using security settings like 2FA and Captcha to safeguard your Virtual Practice.
To set up 2FA for your Virtual PracticeEnable Patient Self-Registration
This setting allows you to control patient self-registration. By toggling the checkbox, you can enable or disable the ability for patients to register themselves via the web application. Additionally, it includes an account approval protocol for new patients.

If the ‘Require Administrative Confirmation of Self-Registered Patients’ option is activated, remember that patients will only gain full access to services after their account receives administrative approval.
Registration Form Settings
The Registration Form Settings allows to personalize the patient onboarding experience. You can display custom welcome messages or instructions and decide which fields are visible on the registration forms. By default, fields such as the Email and/or Phone Number, First Name, Last Name, Biological Sex, and Date of Birth are mandatory.
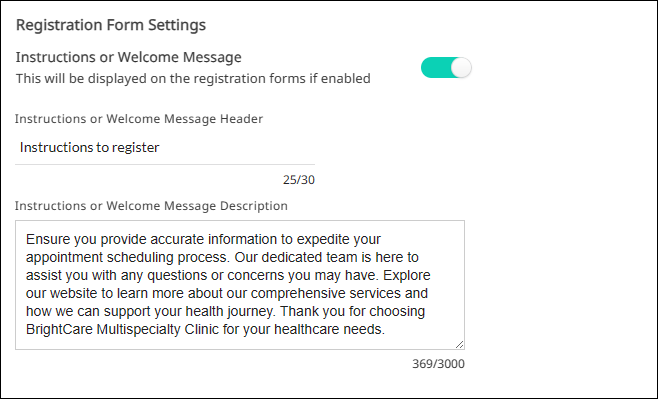
Instructions or Welcome Message: Tailor the welcome messages, instructions, and field preferences for patient registration forms. Enable the “Instructions or Welcome Message” toggle to display custom messages or instructions during the self-sign-up process. Add a custom header to provide personalized information guiding patients effectively.
Registration Form Field Settings: Customize the display of fields in the patient registration form with the “Registration Form Field Settings.” Specify whether each field is mandatory or optional and personalize field terminologies. Note that certain fields such as the Gender, Insurance Provider and MRN are non-customizable. For customizing field terminologies, simply tap the edit button next to the field names, add your values, and save. These customizations apply only to self-sign-up forms.
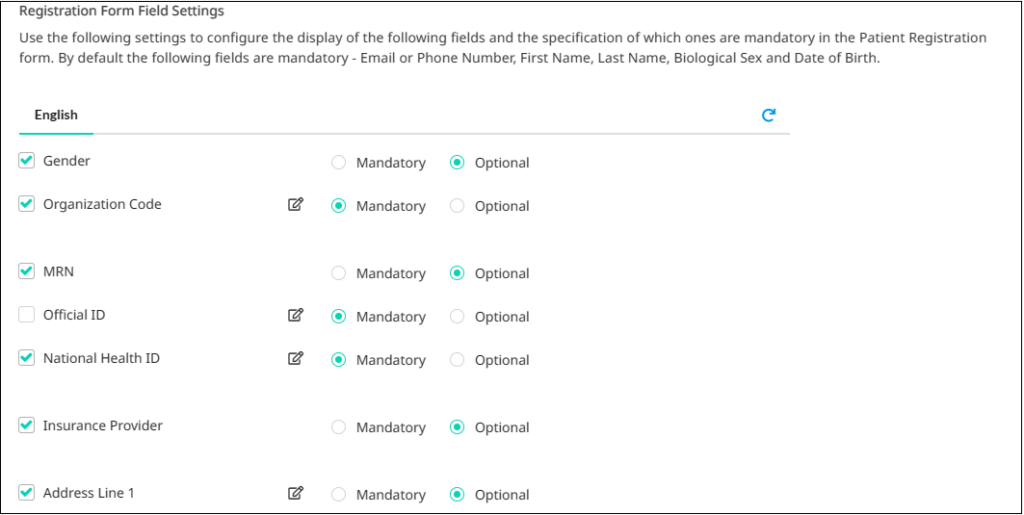 Note on Client Organization Code: Ensure that the Client Organization feature is active and properly set up in your Virtual Practice before enabling this in the Registration Forms.
Patient Registration Consent Settings
Activate this setting if you require patients to provide an e-signature as part of agreeing to the Patient Terms during registration. This adds an extra layer of consent and acknowledgment from the patient’s end.

Defining Patient ID Prefix
Every registered patient is assigned a unique, auto-generated Patient ID (PID), which serves as a primary identifier in your Virtual Practice. The default prefix for this ID is ‘P’, but you can customize it (up to 3 uppercase characters) to better suit your practice’s identification system by editing the Patient ID Prefix field. Remember, changing this prefix will only affect new patient records.

Note on MRN ID: For clinics and hospitals, the MRN ID field is an additional identifier that can be manually added and updated for patients who already have an existing ID in your external systems.
Adding/Registering Patients to the Virtual Practice:
Patients can be added, or they can register to your Virtual Practice in the following ways:
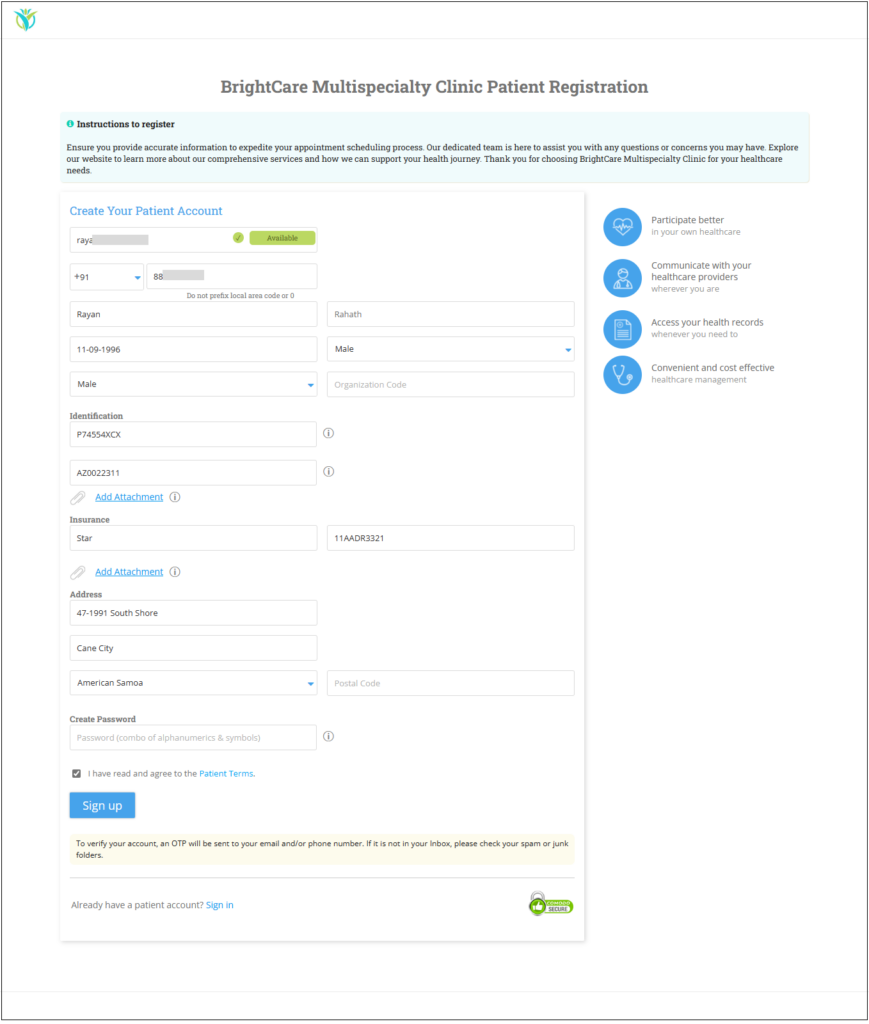
Self sign-ups: Patients who wish to register as a patient in your Virtual Practice can visit your patient portal website, click on the ‘Sign Up’ button, and enter the details in a form based on the Patient Registration Settings. Patients can also self-sign up through the patient mobile application, if applicable. Once they submit the form, a patient account will be created for them, in your Virtual Practice. The patient will receive an email and/or SMS notification, asking them to verify their email address and/or phone number.
You can share your patient portal URL with your patients, in many innovative ways, like displaying the URL at your practice location, printing it on your official letterhead, business cards or prescription pads etc.
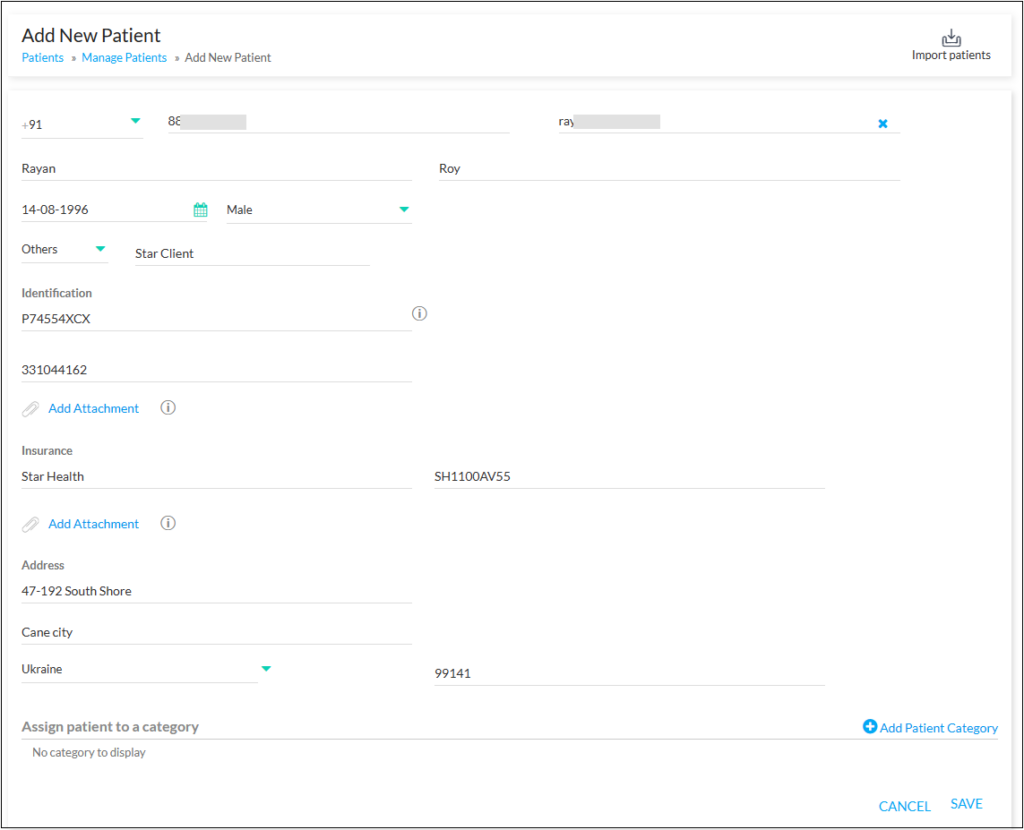
Adding Patients: Your staff user with relevant permissions, can manually add patients to the Virtual Practice if you have their valid email address or phone number, or both. Just enter the details of the patient, requested in the form thereby creating a patient account. You can also assign the patient to a particular category or client organization (if applicable), if you have already created one.
Team users adding a patient will be subject to the fields activated in the ‘Patient Registration Settings’. This encompasses default fields such as First Name, Last Name, Email, Phone Number, Date of Birth, Biological Sex, and additional fields enabled in the ‘Registration Form Field Settings’. The default fields, such as Date of Birth and Biological Sex, as well as other fields enabled in the ‘Registration Form Field Settings,’ will be optional, regardless of whether they are designated as mandatory in the ‘Patient Registration Settings’.
 Once the patient has been added successfully, they will receive an email or SMS notification, asking them to verify their email address or phone number.